INGREDIENTS & RECIPES
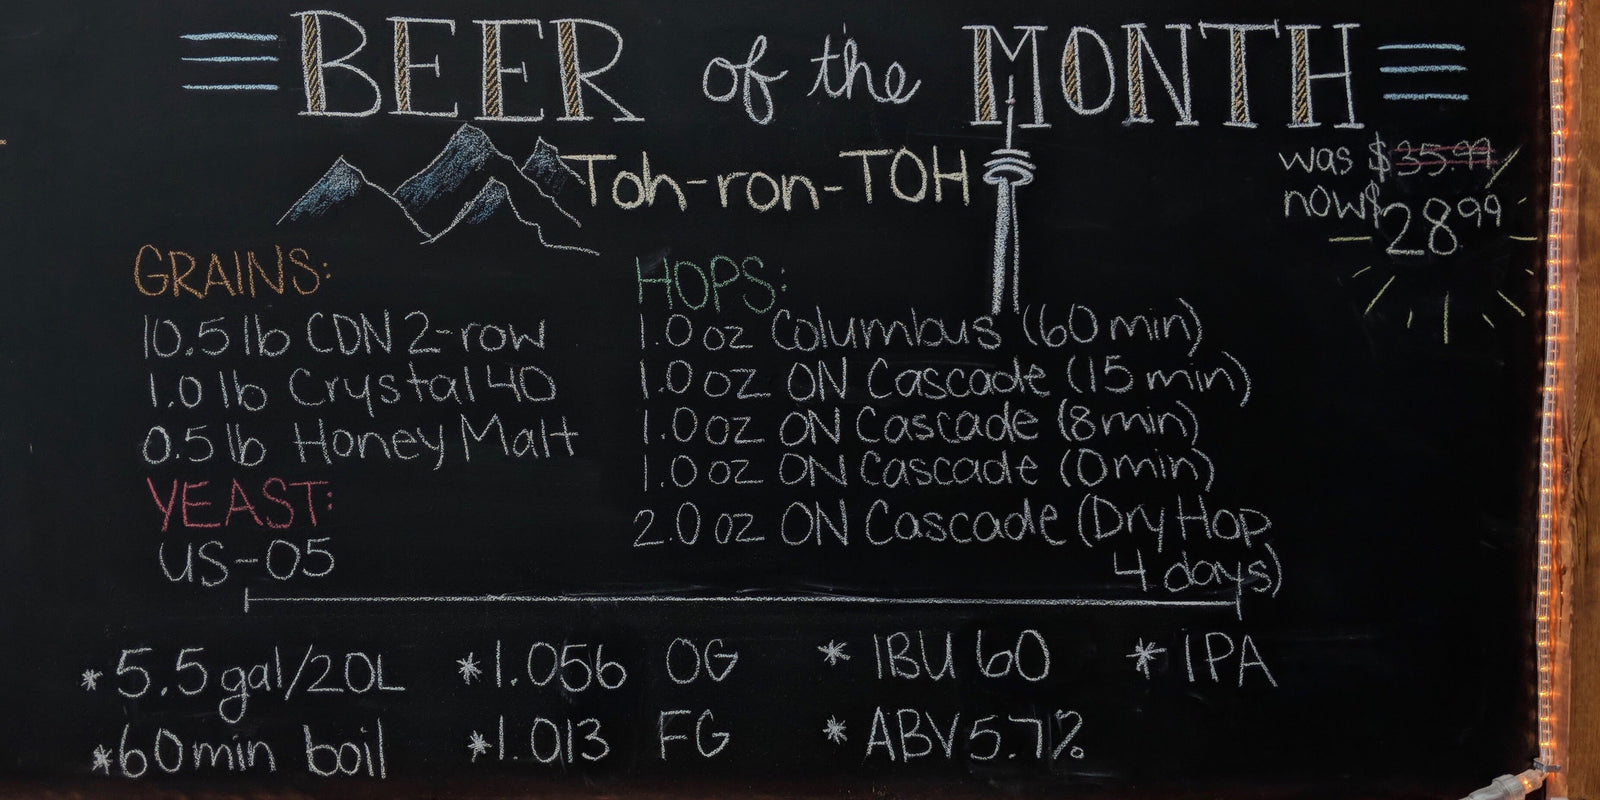
  • Try one of our peer reviewed recipes and ingredient kits! Each of these recipes are designed and hand crafted by the staff at KJ. 

    All kits include the required ingredients and instructions. 

  • EQUIPMENT
  • Starter kits are a great way to get started brewing. Our different kits have everything you need to get that first batch cooking. 

  • Toh-ron-TOH

    April 01, 2018 7 min read

    Toh-ron-TOH

    Beer of the Month Program

    April 2018 –  Toh-ron-TOH 

    One of the best parts about making beer (aside from drinking it) is the social aspect. Brewers love to swap recipes, discuss what well or horribly wrong in their brews. We thought it would be a fun idea to start a beer conversation here. We’re going to make a beer every month here and encourage other brewers to make it as well. In the end, we’re hoping we can share our opinions and experiences with the recipe and crowd-source some improvements. The recipes will be easy to make and we will gladly assist new home brewers in the production of these beers. They will all be 5.5 gallons in size. We find that after fermenting and racking a 5.5 gallon batch turns into a standard 5 gallon batch pretty quickly.

    At the start of every month we will post the recipe in store, as well as on our websiteFacebookInstagram, and Twitter. We will also have a set price for the recipe that will include a discount of up to 25%!

    Toh-ron-TOH

    IPA – 5.5 Gal – OG 1.056 – FG 1.013 – ABV 5.7% – IBU 60 – SRM 7

    If you ask a person from Toronto how they pronounce their city name, they’ll look at you incredulously and say “Torono” as if it makes perfect sense. Now, ask someone from outside of Ontario and they’ll say “Toronto”. Why is this important? Well it just so happens that this beer has a distinct West Coast style – but it is brewed with hops from Ontario exclusively. So we’ll bridge the gap and give it an Ontario name with a west coast pronunciation.

    Of course, the name is irrelevant if the beer is terrible, thankfully, this one is delicious. It is a full bodied IPA with distinct floral and pine notes. The hops are sourced from Highland Hop Yard located in Meaford, ON (Side note, we also carry their Chinook and Centennial hops – stay tuned for future recipes including these). It’s a very hop forward beer, but there is a nice malt backbone courtesy of the Crystal and Honey malts. Let’s brew up a batch and crack one as our great country defrosts this spring.  

    Printer Friendly Version

    Ingredients (Purchase this Recipe)

    Grains
    • Canadian 2 Row x 10.5lbs
    • Crystal Light (40L) x 1lb
    • Honey Malt x 0.5lb
    • Acidulated x .2lb
    Hops
    • Columbus (13% A.A.) – 1oz @ 60min
    • Cascade – Ontario (6.79% A.A.) – 1oz @ 15 minutes
    • Cascade – Ontario (6.79% A.A.) – 1oz @ 8 minutes
    • Cascade – Ontario (6.79% A.A.) – 1oz @ 0 minutes

    DRY HOP

    • Cascade – Ontario (6.79% A.A.) – 2oz -> 4 Days
    Yeast
    • US-05
    Extras
    • Irish Moss (1 tsp for last 15 minutes of boil)
    • Dry Malt Extract (150-170g for priming at bottling)
    *Equipment Requirements are listed at the bottom*

    Instructions

    Important Tips on Brewing
    • Be extra cautious when it comes to cleaning! Once you have stopped boiling your wort everything that gets in contact with the beer MUST be sanitary.
    • The temperature of your mash is ABSOLUTELY CRITICAL. Not being in the 150-155f range can drastically affect your beer. Make sure you correct the temperature once all of the grain has been added to the mash.
    • Always let your beer ferment for 10 days! Do not disturb it, do not open the lid. It is absolutely natural for the airlock to stop bubbling after a few days, it is still fermenting though.
    • Oxidization: Airspace is always something to consider. When undergoing primary fermentation airspace is needed so that the beer can bubble up and ferment vigorously without leaking out of the container. The fermentation creates a layer of CO2 that remains in the pail due to the airlock. Once primary fermentation is over and the lid has been opened, the layer of CO2 dissipates and oxygen replaces it. At this point airspace can ruin your beer. When racking into carboys make sure they are filled to the top, or you blast CO2 inside to prevent oxidization. Ask us for details on this!
    • Before bottling, make sure you use a priming calculator (many can be found online) to verify the amount of sugar that needs to be added.

    We’re going to be producing this beer with the Brew-in-a-Bag (BIAB) method. It is an easy, and cost effective way to make great all grain beer.

    Mashing -> converting the grain into a fermentable liquid.

    • Bring 6 gallons of water in your brew pot to 153°F. This is our strike temperature. Turn off the heat to the pot.
    • Wrap the muslin/nylon bag around the brew pot and slowly pour all the milled grains into the bag. Stir them in while adding to prevent clumps. The addition of grain should drop the temperature down to 150-155°F.
    • We want to mash the grain at 153°F for 60 minutes. It is very important to hold the temperature at 153°F. If the temperature rises above 155°F it hurts the fermentation, or if it dips below 149°F it can lead to a thinner tasting beer.
      1. The first 15-30 minutes are essential for the success of your brew. The temperature HAS TO BE IN THE RANGE OF 150-155°F. Sometimes adding the grain to the strike water does not lower the temperature enough, in this case add a little bit of cold water to bring the temperature down. Cover the pot with your lid and let it sit.
      2. Most brew pots will be able to maintain 153°F without adding heat for 20 minutes, we recommend checking the temperature every 15 minutes, and if it drops add more heat to bring it up. We recommend opening the lid and using a thermometer in the liquid.
    • After 60 minutes, bring the temperature of the mashing grain up to 170°F and hold for 10 minutes. This is our mash out.
    • Time to remove the grain. Lift the bag full of grain out of the brew pot. Let the liquid in the bag dribble into your wort. Once that is done, put the bag inside of a brewing pail, or another empty pot. There will be about 4 gallons of wort in the brewpot, we need to get it to 6 gallons before we can begin the next stage.
    • Run warm water through the grains in the bag, aim for 170°f – let it run through the grains and add to the brewpot. Add until you reach 6 gallons.
      1. PSA: It is natural to think that the grains need to be squeezed to get all of the liquid out of them, DO NOT DO THIS. Aggressively squeezing the grains will lead to tannin extraction and a doughy taste in your beer. Lightly pressing the bag is fine, but do not try to squeeze every last drop out.

    Boiling -> Hop addition time

    • Bring 6 gallons of your wort to a rolling boil, and let it boil for 5 minutes, this is called the hot break.
    • Add 1oz of Columbus hops (the only non-Ontario hop is this beer) to the pot and set a timer for 60 minutes, keep the wort boiling (212°f) and uncovered.
    • With 15 minutes left in the timer add the Irish Moss, 1 ounces of Cascade, and if you’re using a wort chiller add that too.
    • With 8 minutes left in the timer, add 1 oz of Cascade, and then when your timer goes off add the final ounce of Cascade and turn the heat off. It is now time to start cooling the wort down to 75°F (20-25°C) as quickly as possible
      1. We love using a wort chiller for this, it can get the beer down to temperature in 20-30 minutes. Otherwise, you can immerse the brew pot in an ice bath or wait it out. The longer it takes, the greater the risk of infection

    Fermentation -> Turning the wort into beer

    • After the boil is done it is time to be extra careful in regard to sanitation. We recommend using a no-rinse sanitizer called Starsan. Mix ¼ tsp of it with water in a 500ml spray bottle. Before we touch any part of the beer we spray it with Starsan.
    • Transfer the cooled wort into your fermenting pail or carboy. Run it though a strainer to catch any hop or grain residue.
      1. It is also an important time to take a hydrometer reading. It should be around 1.056 give or take a few points.
    • Your choice of fermentation vessel is important. During primary fermentation, it will bubble up quite a bit, you want to be sure there is airspace for it to work away. Otherwise the pressure of it will push out the airlock.
    • Make sure the wort has been cooled to at least 25c!!! Adding yeast at a higher temperature will likely kill it.
    • Once the beer is in the fermenter, pour in the 11.5g sachet of US-05 yeast
    • Put the bung and airlock in the hole (make sure there is water filled up to the line in the airlock). If using a pail, make sure the lid is sealed tight. Put the pail in a room that is in the range of 19-23°c.
    • DRY HOP ADDITION: After 7 days have passed remove the bung from the lid and quickly pour in the two ounces of Cascade hops.
      1. To be sure that no oxygen got into the vessel, you can also add 100g of dextrose mixed with 100ml of boiling water. This will stimulate a quick fermentation and expel any O2 in the vessel.
    • Three days later (day 10) it is time to take a hydrometer reading. It should be somewhere between 1.010-1.014.
    • Lately, we have been of the opinion that secondary is an unnecessary step. Unless you are kegging, we recommend proceeding to the bottling stage. Clarification can occur in the bottle rather than in a carboy, and the risk of oxidization is greatly reduced.

    Bottling -> We’re getting close to Beer Time now.

    • Rack the now fermented beer into a bucket.
    • At the same time, mix the priming sugar with 300ml of boiling water and add to the beer. Stir it in VERY gently.
      1. Make sure to check out a priming calculator to verify the correct amount of sugar. Too much sugar and your beer will end up foamy, or even start blowing the caps off! Too little and the beer won’t be fully carbonated.
    • Rack the beer into your bottles or growlers. Then, let them sit for 2-3 weeks at room temperature. Chill and enjoy!