
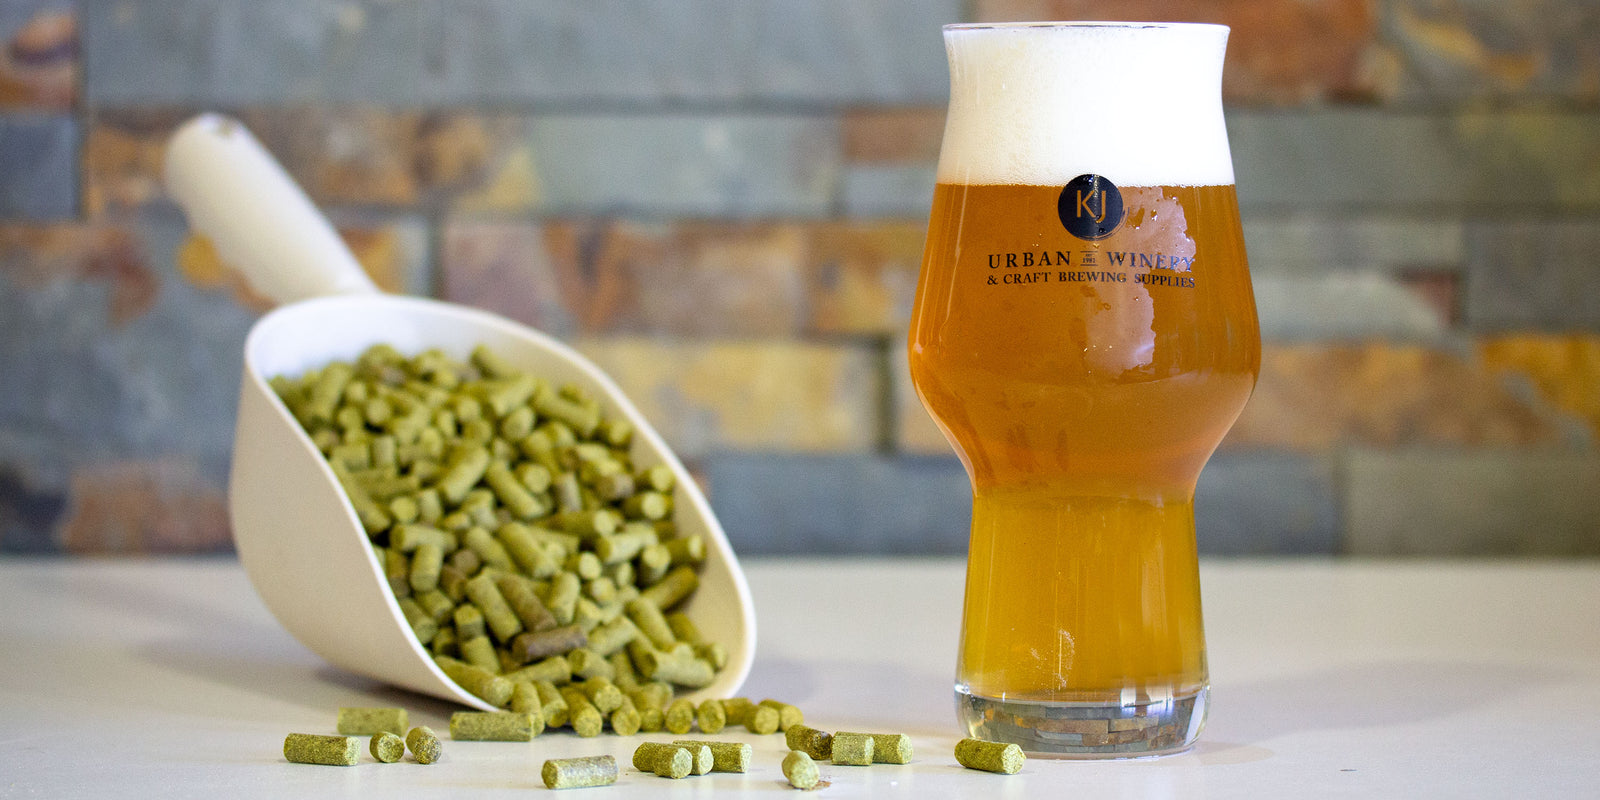
Packer's Westy - November 2022 Beer of the Month

Beer of the Month Program
November 2022 - Packer's Westy - $50.99
Each month we release a new recipe for our Beer of the Month. They are always recipes that we have personally brewed ourselves, and have to pass a taste test amongst all of the staff here (tough job we know!). The recipes will be easy to make and we will gladly assist new home brewers in the production of these beers. They will all be 5.5 gallons in size. We find that after fermenting and racking a 5.5 gallon batch turns into a standard 5 gallon batch pretty quickly.
At the start of every month we will post the recipe in store, as well as on our website, Facebook, and Instagram. We will also have a set price for the recipe that will include a discount of up to 25%!
Packer's Westy
West Coast IPA – 5.5 Gal - OG 1.061 – FG 1.012 – ABV 6.4% - IBU 74 – SRM 4
Purchase Online | Printable Instructions
This month’s recipe is one from a longtime KJ customer. We tried his West Coast IPA at a brewing club meeting in September and were blown away. We knew right away we had to brew it ourselves and share it with everyone else. It has a great balance of hop aroma and flavour, along with a light but crisp malt expression. It’s a throwback recipe to the original IPA style with lots of good clean bitterness punctuated with pine and citrus hop notes. The Cali ale yeast ferments it clean and well.
Having the right water profile for this recipe is imperative. Packer recommends using RO water for 75% of the total water in the brew. For example, if you start with 6 gallons of water (23L) in the kettle – you will want to have 17L of RO water and 6 of city water. For any sparging we recommend maintaining the same blend. We do sell RO water in 11L canisters, grabbing two of those should cover your needs. Another important part of the water profile is making sure there is a 4:1 sulfate to calcium ratio. This is achieved by adding 1 tsp of Gypsum to your mash water before mashing in.
Lastly, a short dry hop for this recipe is going to maximize the aroma. We recommend dry hopping for 1-3 days only. We personally did a 2 day dry hop. The important thing is not let the hops sit for more than 3 days (because you will lose aroma)

|
Ingredients |
|
|
|
Grains |
Amount (lbs) |
|
|
Rahr Pilsner |
11.5 |
|
|
Acidulated |
0.1 |
|
|
Hops |
Amount (oz) |
Boil Schedule (minutes) |
|
Simcoe |
1.5 |
75 |
|
AFTER Boil Schedule |
||
|
Simcoe |
1.5 |
10 mins at 185F |
|
Centennial |
1 |
10 mins at 185F |
|
Dry Hop Schedule |
|
|
|
Centennial |
2 |
2 days before bottling (Typically day 8-10) |
|
Columbus |
1 |
2 days before bottling (Typically day 8-10) |
|
Sabro |
1 |
2 days before bottling (Typically day 8-10) |
|
Yeast |
|
|
|
Cali Ale – Escarpment Labs |
1 Package |
Dry yeast alternative: US-05 |
|
Extras – Sold Separately |
|
|
|
Gypsum |
1 tsp added at mash in |
|
|
RO Water |
75% of your total water, other 25% city tap water |
|
|
Irish Moss |
1 tsp for last 15 minutes of boil |
|
|
DME/Dextrose |
150g (1/2 cup) at bottling for priming
|
|
Important Tips on Brewing
- Be extra cautious when it comes to cleaning! Once you have stopped boiling your wort everything that gets in contact with the beer MUST be sanitary.
- The temperature of your mash is ABSOLUTELY CRITICAL. Not being in the 150-155f range can drastically affect your beer. Make sure you correct the temperature ASAP once all of the grain has been added to the mash.
- Always let your beer ferment for 10 days! Do not disturb it, do not open the lid. It is absolutely natural for the airlock to stop bubbling after a few days, it is still fermenting though.
- Oxidization: Airspace is always something to consider. When undergoing primary fermentation airspace is needed so that the beer can bubble up and ferment vigoursley without leaking out of the container. The fermentation creates a layer of CO2 that remains in the pail due to the airlock. Once primary fermentation is over, and the lid has been opened, the layer of CO2 dissipates, and oxygen replaces it. At this point airspace can ruin your beer. When racking into carboys make sure they are filled to the top, or you blast CO2 inside to prevent oxidization. Ask us for details on this!
- Before bottling, make sure you use a priming calculator (many can be found online) to verify the amount of sugar that needs to be added.
Instructions
(please note, most of these pictures are from other beers - but the beauty of brewing is that the majority of steps for brewing beers are very similar, and these photos are equally instructive for any style of beer.)
Mashing -> converting the grain into a fermentable liquid.
- Bring 6 gallons of water in your brew pot to 155°F. This is our strike temperature. Turn off the heat to the pot.
- Then, add 1 tsp of gypsum to your water (if you are following our water profile advice)
- Wrap the muslin/nylon bag around the brew pot and slowly pour all the milled grains into the bag. Stir them in while adding to prevent clumps. The addition of grain should drop the temperature down to 150-155°F.
- We want to mash the grain at 153°F for 60 minutes. It is very important to hold the temperature at 153°F. If the temperature rises above 155°F it hurts the fermentation, or if it dips below 149°F it can lead to a thinner tasting beer.
- The first 15-30 minutes are essential for the success of your brew. The temperature HAS TO BE IN THE RANGE OF 150-155°F. Sometimes adding the grain to the strike water does not lower the temperature enough, in this case add a little bit of cold water to bring the temperature down. Cover the pot with your lid and let it sit.
- Most brew pots will be able to maintain 153°F without adding heat for 20 minutes, we recommend checking the temperature every 15 minutes, and if it drops add more heat to bring it up. We recommend opening the lid and using a thermometer in the liquid.

- After 60 minutes, bring the temperature of the mashing grain up to 170°F and hold for 10 minutes. This is our mash out.
- Time to remove the grain. Lift the bag full of grain out of the brew pot. Let the liquid in the bag dribble into your wort. Once that is done, put the bag inside of a brewing pail, or another empty pot. There will be about 4 gallons of wort in the brew pot, we need to get it to 6 gallons before we can begin the next stage.
- Run warm water through the grains in the bag, aim for 170°f – let it run through the grains and add to the brew pot. Add until you reach 6 gallons.
- PSA: It is natural to think that the grains need to be squeezed to get all the liquid out of them, DO NOT DO THIS. Aggressively squeezing the grains will lead to tannin extraction and a doughy taste in your beer. Lightly pressing the bag is fine, but do not try to squeeze every last drop out.
Boiling -> Hop addition time
- Bring 6 gallons of your wort to a rolling boil, and let it boil for 5 minutes, this is called the hot break. Start a 60-minute timer. Keep the wort boiling (212°f) and uncovered.

- Set a timer for 90 minutes, keep the wort boiling (212°f) and uncovered.
- With 75 minutes left in the timer, add 1 ½ ounces of Simcoe hops.
- With 15 minutes left, add 1 tsp of Irish Moss, and if you’re using a wort chiller add that too.
- When your timer goes off, turn off the heat, and now it’s time to add MORE hops!
Cooling & Whirlpooling -> Let’s Get Hoppy
- We need to cool the beer a bit before adding more hops. Our target temperature is 185°F. This will not take too long to cool if you’re using a wort chiller. Adding hops at 185°F will maximize the flavour of the hops but add just a little bitterness.
- Once the wort is down to 185°F, add 1.5 ounces of Simcoe and 1 ounce of Centennial hops. Let the beer sit for 10 minutes. Do NOT actively cool the beer.
- After the 10 minutes are complete. Start cooling the beer down to 25°C, this is our yeast pitching temperature.
Fermentation -> Turning the wort into beer
- After the boil is done it is time to be extra careful regarding sanitation. We recommend using a no-rinse sanitizer called Starsan. Mix ¼ tsp of it with water in a 500ml spray bottle. Before we touch any part of the beer, we spray it with Starsan.
- Transfer the cooled wort into your fermenting pail or carboy. Run it though a strainer to catch any hop or grain residue.
- It is also an important time to take a hydrometer reading. It should be around 1.061 give or take a few points.
- Your choice of fermentation vessel is important. During primary fermentation, it will bubble up quite a bit, you want to be sure there is airspace for it to work away. Otherwise, the pressure of it will push out the airlock.
- Make sure the wort has been cooled to at least 25c!!! Adding yeast at a higher temperature will likely kill it.
- Once the beer is in the fermenter, pour in the entire package of Cali Ale yeast from Escarpment Labs
- Put the bung and airlock in the hole (make sure there is water filled up to the line in the airlock). If using a pail, make sure the lid is sealed tight. Put the pail in a room that is in the range of 19-22°C.
- Let the beer for ferment at least 8 days. There will be a lot of activity in the airlock for the first few days and then it will slow down. Resist the urge to open the lid and check on it!
- After at least 8 days have passed, it is time to do the dry hop. We want the dry hops to sit in the beer for no more than 3 days. So, if you don’t have time to bottle 2-3 days after adding the dry hops, wait until you do. The beer can safely sit *sealed* in a pail for up to 3 weeks. When ready, add 2 ounces of Centennial, 1 ounce of Columbus, and 1 ounce of Sabro.
- For example. If you brew on the 1st day of the month. And you are busy every day after that until the 16th. Then add the dry hops on either the 13th or 14th. This will give the dry hops the 2-3 days of contact time required.
- Once the lid is open, potential oxidization is a concern. If you have CO2 available, we recommend spraying a layer of it in the fermenter after adding the hops.
- If you don’t have CO2, then we recommend making a small tincture of dextrose and water. Boil 100ml in the kettle and mix with 100g of dextrose. Stir and dissolve, and then pour into the fermenter. This will create a mini fermentation which will result in the production of CO2 which keeps the oxygen at bay. Have the tincture ready before you add the hops. The less time the lid/bung is open the better!
- After the 2-3 day dry hop is complete, it is time to move to the bottling stage. Set aside 90 minutes of time to complete the entire bottling process.
Bottling -> We’re getting close to Beer Time now.


- First, take a hydrometer reading. It should be somewhere between 1.009-1.012.
- Rack the now fermented beer into a bucket.
- At the same time, mix the priming sugar with 300ml of boiling water and add to the beer. Stir it in VERY gently.
- Make sure to check out a priming calculator to verify the correct amount of sugar. Too much sugar and your beer will end up foamy, or even start blowing the caps off! Too little and the beer won’t be fully carbonated.
- Rack the beer into your bottles or growlers. Then, let them sit for 2-3 weeks at room temperature. Chill and enjoy!